Getting Started Guide
This tutorial will introduce you to the basic concepts and features of TK8 StickyNotes.
1. Accessing the Program
 You can start the program by using the icon on your desktop. However, did you know that when the program is already started and you double click on the desktop icon again, it will bring up the Control Panel of TK8? You can start the program by using the icon on your desktop. However, did you know that when the program is already started and you double click on the desktop icon again, it will bring up the Control Panel of TK8?
 You can also bring up the Control Panel when you click on the taskbar icon near the system clock. You can also bring up the Control Panel when you click on the taskbar icon near the system clock.
By using this Control Panel, you can effectively manage all your notes.
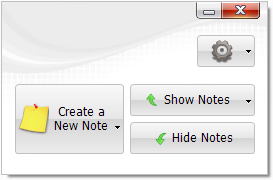
When you click on the gear icon, you can access the Program Settings, access the User's Manual, and enter your license key.
If you need to close the program, click on the red top right button.
2. How To Create, Show, and Hide Notes
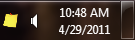 To create a new note, click on the “Create a New Note” button on the Control Panel. Additionally you can double-click on the note icon next to the system clock. To create a new note, click on the “Create a New Note” button on the Control Panel. Additionally you can double-click on the note icon next to the system clock.
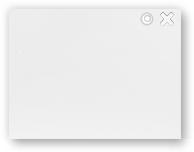 After you have made the note and you don't need it on the screen anymore, you can close it by clicking the top right “X” button on the note. After you have made the note and you don't need it on the screen anymore, you can close it by clicking the top right “X” button on the note.
If you have more than one note open, you can hide them all using the “Hide Notes” button on the Control Panel.
To bring back your hidden notes, click on the “Show Notes” button on the Control Panel.
You can also use keyboard shortcuts to manage your notes:
To create a new note, press Ctrl + Alt + N.
To hide your notes, press Ctrl + Alt + H.
To show your notes, press Ctrl + Alt + S
3. Changing the Appearance of Your Notes
To change the look of your note, right click on it. When the new window appears, click on the color icon to select a preferred color theme.
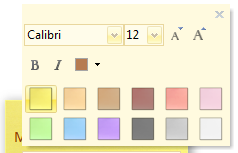 Additionally, you can change the font style, size, and color. You can do this for the entire note or for the selected text only. Additionally, you can change the font style, size, and color. You can do this for the entire note or for the selected text only.
All notes are yellow by default. If you prefer a different color theme, you can change this in Program Settings.
4. Deleting Notes
 As you already know, clicking the top right “X” button on the note does not delete it but hides it. To delete the note, please right click on it and select “Delete” from the appearing menu. As you already know, clicking the top right “X” button on the note does not delete it but hides it. To delete the note, please right click on it and select “Delete” from the appearing menu.
If you accidentally delete the note, you can restore it using the Recycle Bin.
You can also access several other commands and note settings through the right-click menu.
5. Advanced Features
Managing a lot of notes can be hard, but we have included several features to make it easier.
For example, you can use Tags. Tags are like categories or keywords. For each note you can assign multiple tags representing the content on the note. Suddenly managing your notes becomes easy. You can show and hide notes based on their categories. You can also assign a color for each tag so you can visually see what the notes on your screen are about.
Reminders are handy if you want to “set and forget” some information. At the date and time you specify, the note will pop up on your screen.
Did you store something but are now unable to find it? Don't worry - you can use the search functionality to find it quickly. You can also print out the content on the note and email it if needed.
You can easily change how the program should behave on your system. To do this, bring up the Program Settings and change what you don't like.
That's it!
There is a lot more to TK8 StickyNotes than this tutorial has explained. All of the details and additional information are available in the manual.
|